How to Set Up Your Python Environment for AI & ML Assignments
How to Set Up Your Python Environment for AI & ML Assignments
- Home
- Python Environment
- AI & ML Assignments
How to Set Up Your Python Environment for AI & ML Assignments
Artificial Intelligence (AI) and Machine Learning (ML) are making industries around the globe revolutionize rapidly ranging from healthcare and finance to education and robotics. As a researcher or student joining this innovative sector, your initial step is to create a solid, adaptable, and clean Python setup. We at TutorsIndia recognizes the significance of establishing a good ground before exploring algorithms and data modeling.
In this guide, we will guide you through each step you need to take to prepare your Python environment for AI and ML assignments—designed specifically for newbies. At the end of this tutorial, you’ll be ready to work with real-world datasets, train your very first models, and finish your coursework with confidence.
Why Is Environment Setup Important?
You may ask yourself – why is environment setup such a big deal?
Here’s why:
- Avoids Compatibility Problems: ML libraries get updated regularly; a structured environment guarantees your code runs smoothly [4] [5] [8]
- Enhances Concentration: You won’t spend time debugging setup mistakes and can focus on learning ML [3].
- Facilitates Reproducibility: With correct setup, you and your teachers can run the same code and obtain the same output [7].
- Professional Practice: The same practices applied here are applied in actual industry pipelines [10][11].
Why Python?
Thus, Python is the on-demand universal language for AI and ML because it is so simple yet has an enormous ecosystem-tool utility [1][3]. Being readable, friendly to a beginner, and having thousands of ready-made libraries available, Python justifies itself for ML. Let’s mention some of the most useful reasons why Python would suit your ML adventure:
- Very simple syntax easy to understand [1]
- Big libraries: NumPy[4], Pandas[5], Scikit-learn[8], TensorFlow[9], PyTorch[10]
- Fantastic documentation and community support [2][7][9]
- Smooth integration with visualization and data tools[6][7]
- Table of the Content
Step-by-Step: Setting Up Your Python Environment
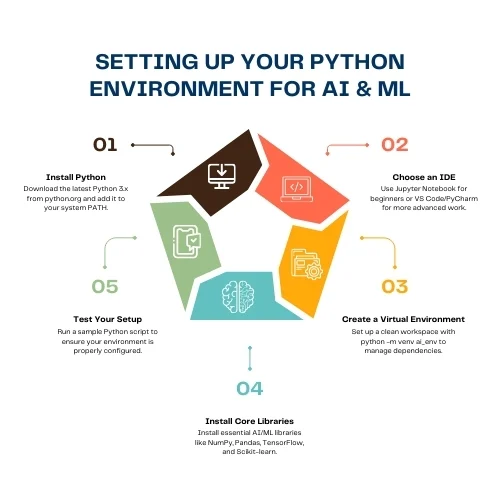
1. Install Python
- Go to https://www.python.org [1]
- Download the latest version of Python 3.x
- In setup, check: “Add Python to PATH”
Test installation with:
| python –version |
If set up properly, this will output the version number.
2. Select a Code Editor (IDE)
An IDE or code editor makes coding simpler by offering features such as auto-complete, syntax highlighting, and project management.
| IDE | Best For | Pros |
| Jupyter Notebook | Beginners & data analysis | Interactive, perfect for learning and documentation[2] |
| VS Code | Intermediate to advanced users | Lightweight, highly customizable |
| PyCharm | Professional projects | Full IDE for Python with rich features |
To install Jupyter Notebook:
pip install notebook jupyter notebook |
Or use JupyterLab, its newer version:
| pip install jupyterlab [2] |
3. Set Up a Virtual Environment
This is a clean environment where you only install the packages your project needs.
Create a virtual environment:
| python -m venv ai_env |
Activate it:
- On Windows:
| ai_env\Scripts\activate |
phyton
- On macOS/Linux:
| source ai_env/bin/activate |
When done, deactivate it with:
Deactivate
4. Install Core AI & ML Libraries
5. Test Your Setup
This is a basic Python code to test all of them:
import numpy as np import pandas as pd from sklearn.linear_model import LinearRegression print(“Environment is ready for AI and ML assignments!”) |
If the script executes without any error, you’re ready to go!
Improving Your Workflow with Tools & Structure
Recommended Folder Structure for Assignments:
Generate your requirements.txt like this:
| pip freeze > requirements.txt |
Real-World Example: Student Use Case
Suppose you’re doing a machine learning problem that predicts student performance from attendance, past grades, and extracurricular activities.
- You’ll begin by reading the dataset using Pandas [5]
- Visualize relationships using Matplotlib/Seaborn [6][7]
- Preprocess the data with Scikit-learn [8]
- Train a Decision Tree or Random Forest model [8]
- Evaluate with accuracy or F1 score [8]
- Save results and export notebook as PDF [2]
This type of workflow becomes integrated seamlessly once your Python environment is set up.
Typical Errors and Solutions
| Error | Cause | Fix |
| ModuleNotFoundError | Missing library | Install with pip install <library> |
| Python not recognized | PATH not set during install | Reinstall with “Add to PATH” option checked [1] |
| Notebook not launching | Jupyter not installed | Install with pip install notebook [2] |
| Slow notebook performance | Too many open apps or large dataset | Restart browser or use a subset of the data |
| CUDA not found (TensorFlow GPU) | Incorrect driver or CUDA version | Match CUDA version with TensorFlow requirements [9] |
Best Practices for Students
- Document Your Code: Utilize Markdown cells to describe logic [2].
- Use Consistent Naming: Names such as train_data, test_data, and model aid readability.
- Track Experiments: Utilize comments or individual notebooks for various approaches [2].
- Clear Outputs: Restart the kernel and execute all cells prior to submission to maintain reproducibility [2].
- Back Up Work: Utilize Git or cloud storage to prevent losing work.
Tips for Academic and Research Excellence
- Merge code + text so your assignments are simple to grade.
- Employ LaTeX in Jupyter Markdown for mathematical expressions such as loss functions [2].
- Include charts such as ROC curves, confusion matrices, or heatmaps to illustrate performance [6][7].
- Cite sources, datasets, and tools utilized in the README.md file.
Conclusion
Having your Python environment set up may be a little thing, but it makes a huge difference in your learning experience. With a clean setup, you avoid confusion, minimize errors, and make your assignments more straightforward to write, read, and grade. You’ll also be following the same workflow employed by actual data scientists and engineers [4][5][8][9][10].
At Tutors India, we’re dedicated to not only enabling you to do assignments—but genuinely learn and improve. With this tutorial, you’re now poised to navigate the world of AI and ML confidently.